Let's start, to be able to use the calculator on our website, you need to have an account, I think you should be able to handle this without any problems. After logging in, in the upper right corner of the page you will find the green button calculator, after clicking it you will be redirected to the page with the calculator.
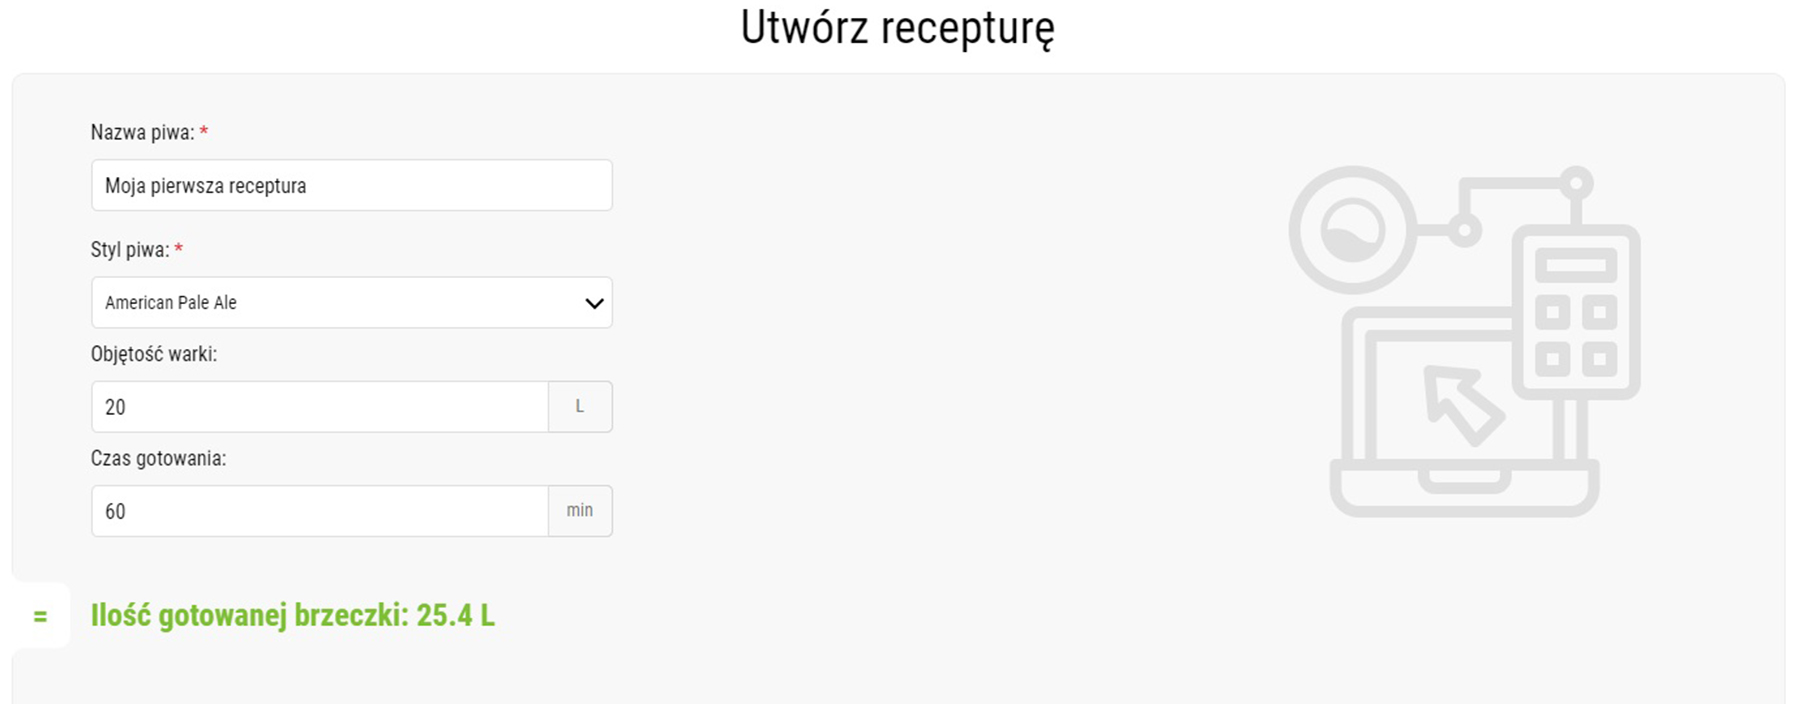
For the purpose of explaining the calculator's operation, we will prepare a beer in the popular APA style, i.e. American Pale Ale. We start by entering the name for our recipe, choose the style of beer and specify how many liters of alcohol we want to prepare. We also provide the boiling time of the wort with hops, here you should know that you should boil the beer not less than 60 minutes, it is related to the evaporation of undesirable compounds precipitating during boiling, but this is a topic for a separate article. After completing this data, we will receive information about the amount of boiled wort, i.e. the amount that should be obtained after desetting, in our case it is 25.4L. Don't worry if there is more than the amount you want to get, the excess wort will evaporate during boiling, some will be absorbed by the hops, the rest will be fermentation losses. In any case, when we obtain the amount of boiled wort specified by the calculator, the bottles should finally receive the amount from the field, volume of the brew, i.e. 20L.

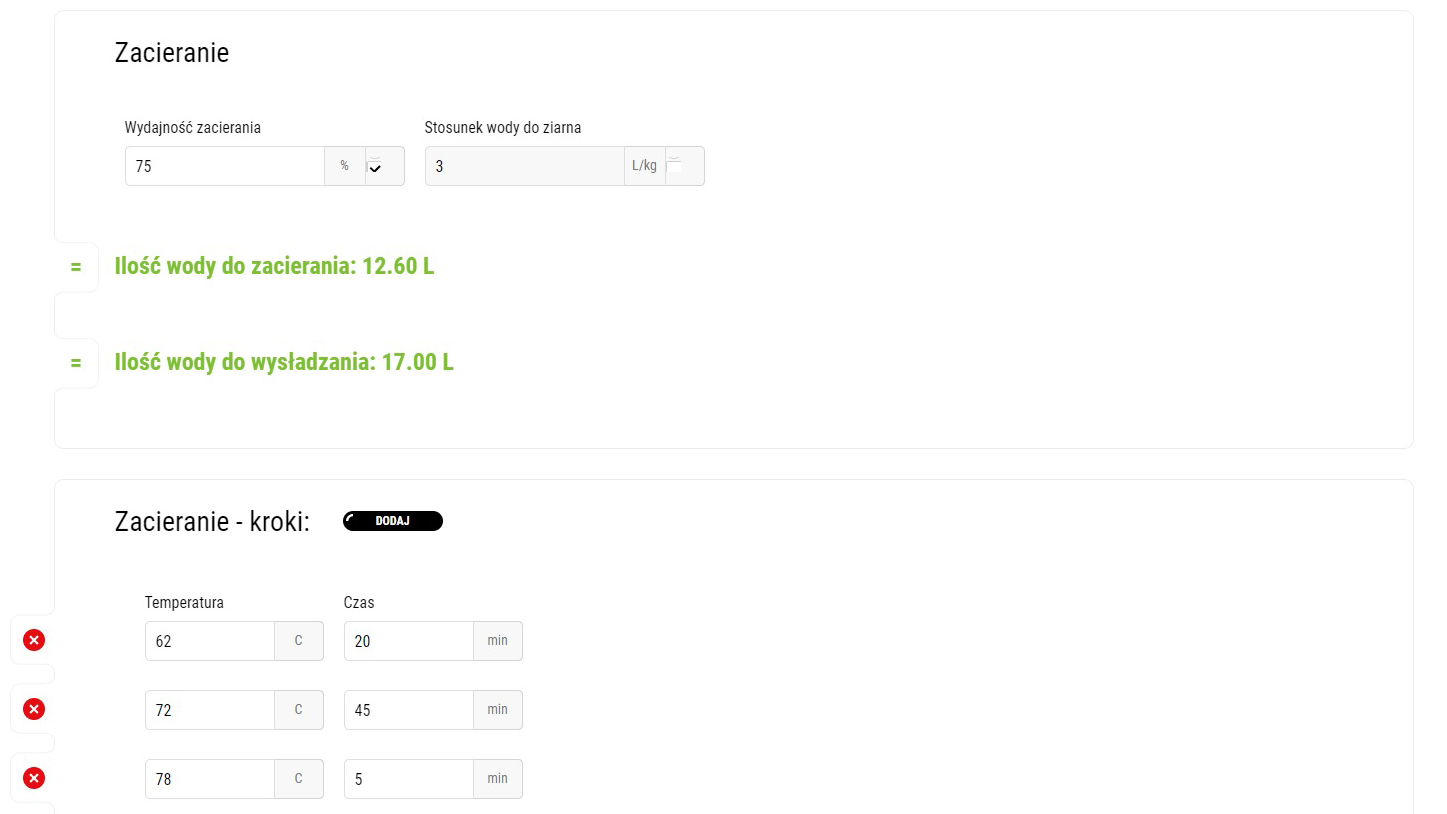
We go down, mashing, i.e. the stage from which the brewing of each beer begins. The "Mashing efficiency" field, which is the percentage of sugar that we are able to extract from the malt during mashing. At the beginning, we recommend setting it to about 70-75% (to do this, we need to mark the tick in the Mash efficiency field), and we will be able to know the efficiency of our "home brewery" only after brewing a few beers. Of course, when you know the efficiency of your brewhouse, enter it. The next field - the water to grain ratio - as the name suggests, this is the amount of water per kilogram of malt that will be used in the recipe. We need to know here that in order for the enzymes to function properly during mashing, the mash must have the appropriate density. It has been assumed that the ratio of 3L per 1 kg of malt is the most optimal, and we recommend that you stick to this at the beginning. The calculated values for the mashing and demining water will appear here only after the first fermenting raw material has been added, and we will come back to them later. Now it's time to add the mashing steps, which are temperatures and saccharification break times. Here it is worth learning something about them, at the beginning it is enough to remember the two most important ones:
maltose break (around 62°C) at this temperature, the beta-amylase enzyme produces simple sugars which the yeast fully fermented. Extending this break will make our beers drier.
dextrinating break (about 72°C) at this temperature, the alpha-amylase enzyme produces mainly a large amount of dextrins - complex sugars that are not fermentable by yeast, thanks to which our beer becomes sweeter and more full-bodied.
In the case of our sample recipe, i.e. American Pale Ale, we want the beer to have a little more body and to harmonize well with intensive hopping with American hops, so we set the break times at 20 minutes for maltose and 45 minutes for dextrinating. The sum of these break times should not be shorter than 60 minutes, of course, the final determinant of the completion of mashing should be the iodine test. The last of the breaks is heating the mash at 78 ° C, 5 minutes is enough to finish the work of enzymes and liquefy the mash for better filtration. This is not the only break scheme that we can use while making beer, to find out more, please refer to the article on our blog.
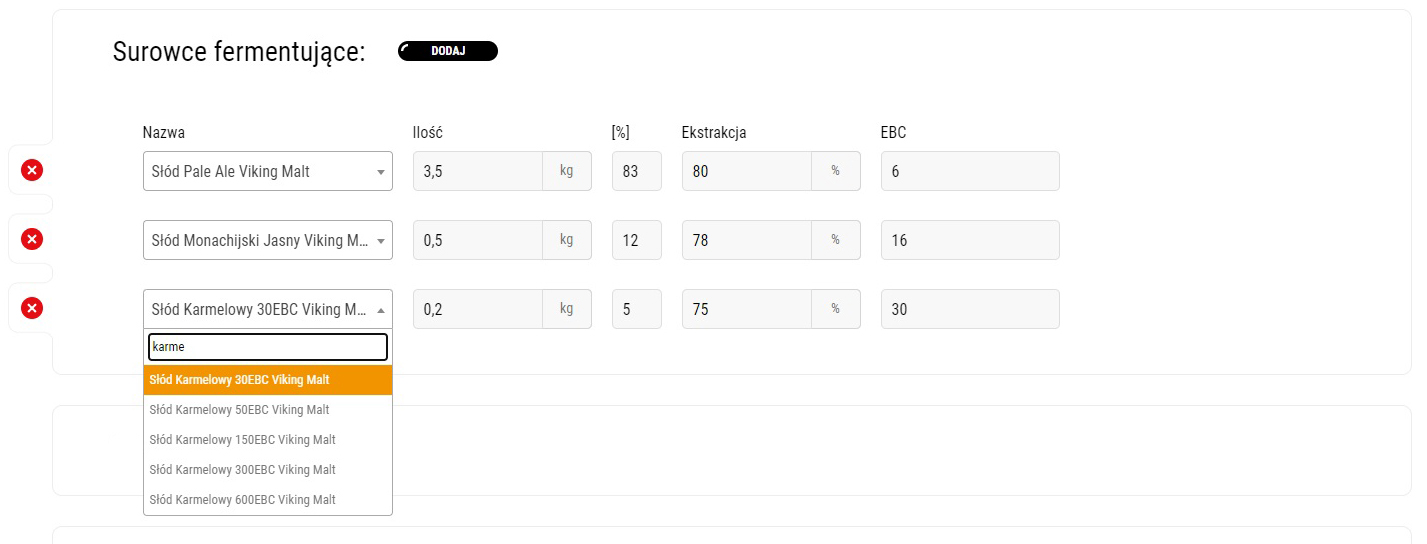
It's time to choose the right fermenting raw materials, the selection of the right malts will add sugars to our recipe and give the wort color. However, we do not have to limit ourselves only to malts, also various sugars, fruit purees and malt extracts belong to this group. The only important thing that should be remembered here is the percentage share in the charge of a given malt, information on this topic can be found in the descriptions of individual products on our website. In an example recipe we will use: 3.5 kg of Pale Ale malt,, 0.5 kg of Munich malt and 0.2 kg of Caramel 30 malt.
After selecting the amount of malts, a little higher, the amount of mashing water will be calculated, i.e. the amount of water that should be heated in the pot before adding the malts, and the amount of water for deleting, i.e. the water used during the filtration of the spent grain.
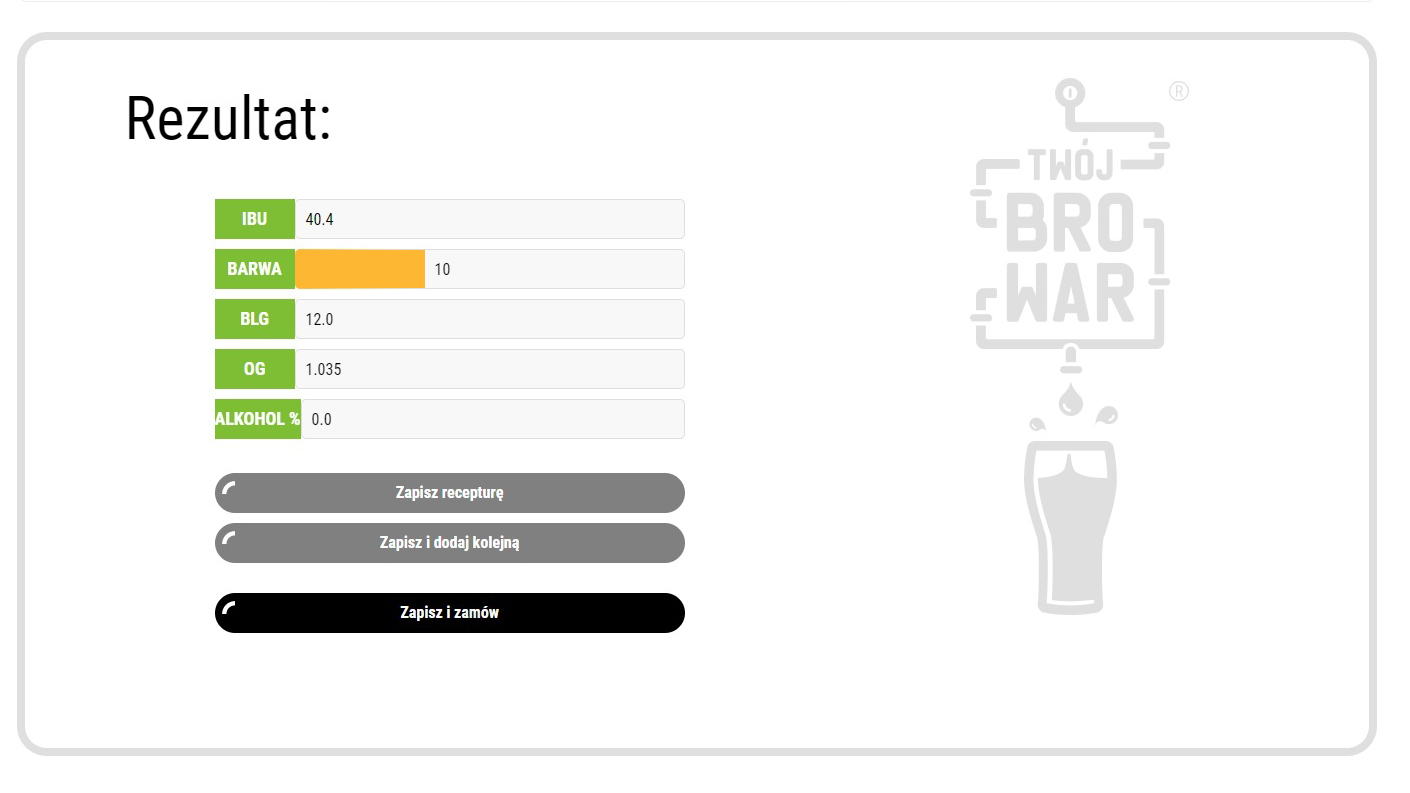
At the very bottom, in the result field, the hue value expressed in the European ECB unit will appear, and the bar will indicate the color corresponding to this hue. Below, the calculator will calculate for us the density of the wort after boiling, expressed in Baling degrees [BLG] and its American equivalent, original gravity [OG].
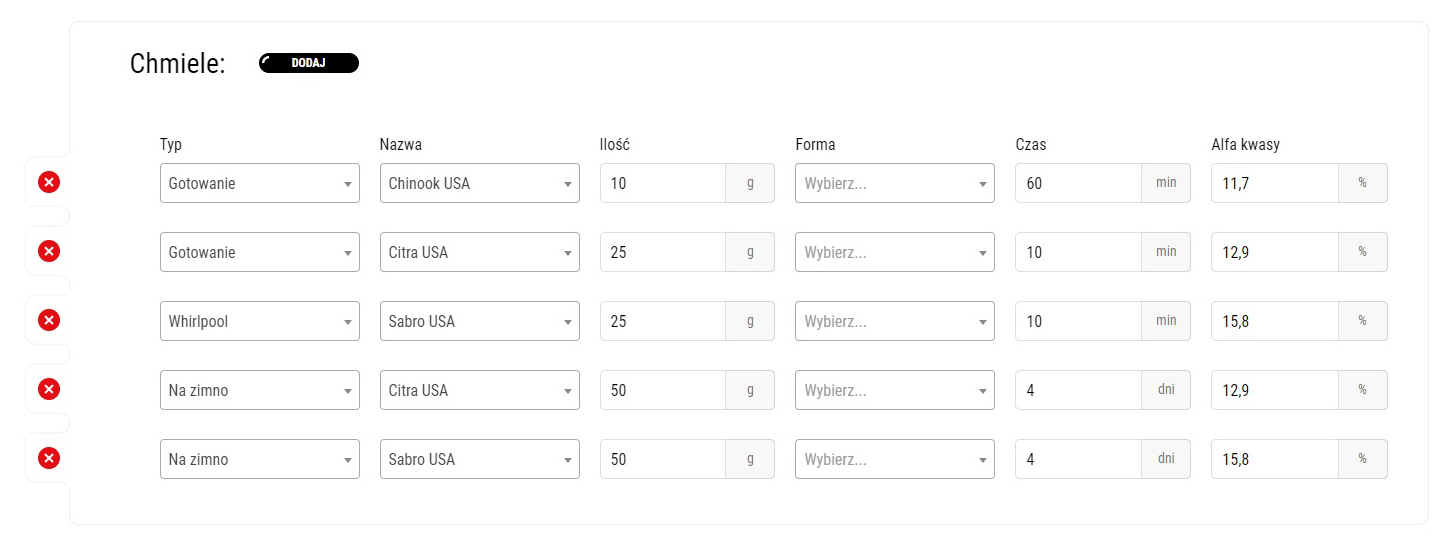
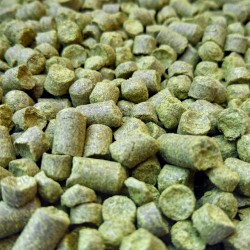
When we achieve the color [EBC] and density [BLG] parameters appropriate for our recipe, we can start hopping. that is, giving our beer bitterness [IBU], taste and aroma, to learn more about hopping, please visit our blog. In the hopping field, add more hops. The first thing we need to define for each hops is its type, i.e. the stage at which we add it, we can choose from:
- "Boiling" - hops are added here for the duration of boiling, which we specified at the very beginning of the recipe, hops added at the very beginning of boiling are designed to make our beer bitter, hops added at the end of cooking add flavor and taste, but remember that also bitterness.
- "Whirlpool" - this stage is hopping after boiling and cooling the wort to about 80 ° C, adding hops at this point will result in a greater aroma, because the aromatic oils will not evaporate as it happens during boiling, hopping in this way does not significantly increase bitterness.
- "Dry Hopping" - hopping during secondary fermentation, usually at this stage, hops are added to the bottles 3-6 days before bottling, this method does not increase the bitterness at all and allows for an intense aroma and flavor of hops.
When choosing hops, we must take into account three factors, the amount of hops we add, the time we add it, and its alpha acids, they affect the bitterness of our beer. Since we have no influence on the alpha acids of a given variety of hops, we can achieve the desired bitterness by selecting the right amounts of hops and boiling times. In order to make you realize how much IBU corresponds to which bitterness, we can use the examples of beers: wheat beers considered to be low-bitter usually have from 8 to about 15 IBU, corporation Lagers, which you can find in every store, are usually around 20-25 IBU, a little more hopped Pilsner can have around 30-40 IBU, Pale Ale or the more popular American Pale Ale is between 40-60 IBU, and everything above 60 IBU, i.e. IPA, AIPA are beers with a lot of bitterness. When choosing the taste and aroma of individual hops, we are not limited by anything but our imagination, we can choose hops with similar aromas, create blends of different flavors.
Coming back to our recipe, I aimed at about 40 IBU, which was made up of previous hops, I wanted citrus-tropical flavors and aromas, hence Citra and Sabro, to intensify the aroma and taste of the beer, I additionally added 50g of each for silent fermentation. As a result, the selected hops gave a total of 40.4 IBUs.
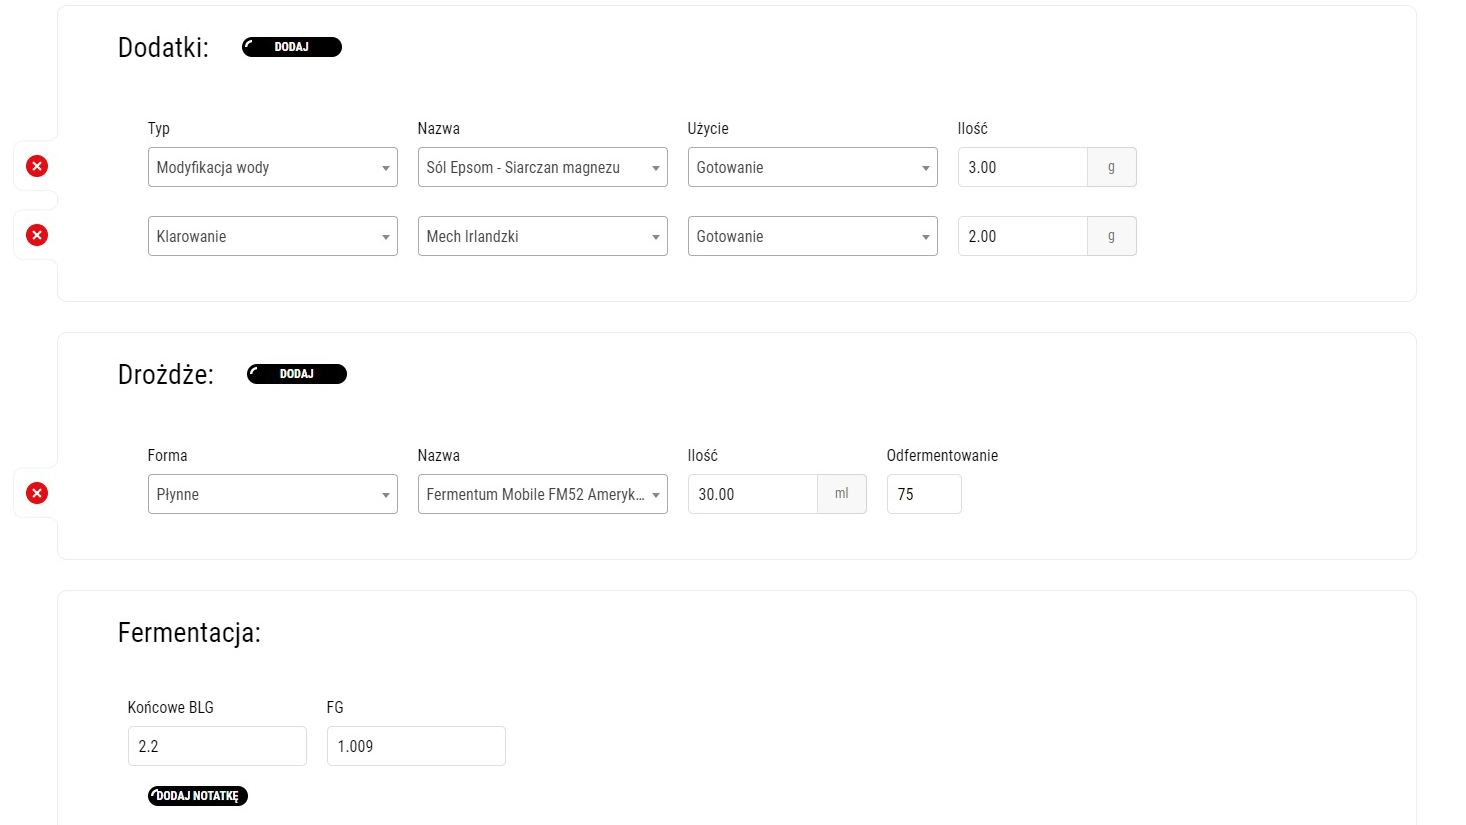
The last two fields in our calculator are additives, i.e. agents for water modification, clarification or spices such as coriander or orange peel. For our recipe, I used Epsom Salt, it is designed to provide sulphate ions that will emphasize the hops, and Irish moss, which will improve the clarity of the wort. The last and the most important ingredient in our recipe will be yeast, here we have a choice between liquid and dried yeast. In our case, I chose FM52 American Dream yeast, dedicated to this style. Each yeast strain has the attenuation specified by the manufacturer, i.e. the ability to convert sugars into alcohol. After selecting the strain, the calculator will show us the final BLG, i.e. the amount of residual sugars that will remain in the beer after fermentation with a given strain, on this basis the potential alcohol content will be calculated. This value will also allow us to estimate the point at which we can consider the end of fermentation. Of course, the actual final BLG result measured by e.g. a balingometer may differ from that calculated by the calculator and should be considered an estimate. At this point, we can also add a note to our recipe.
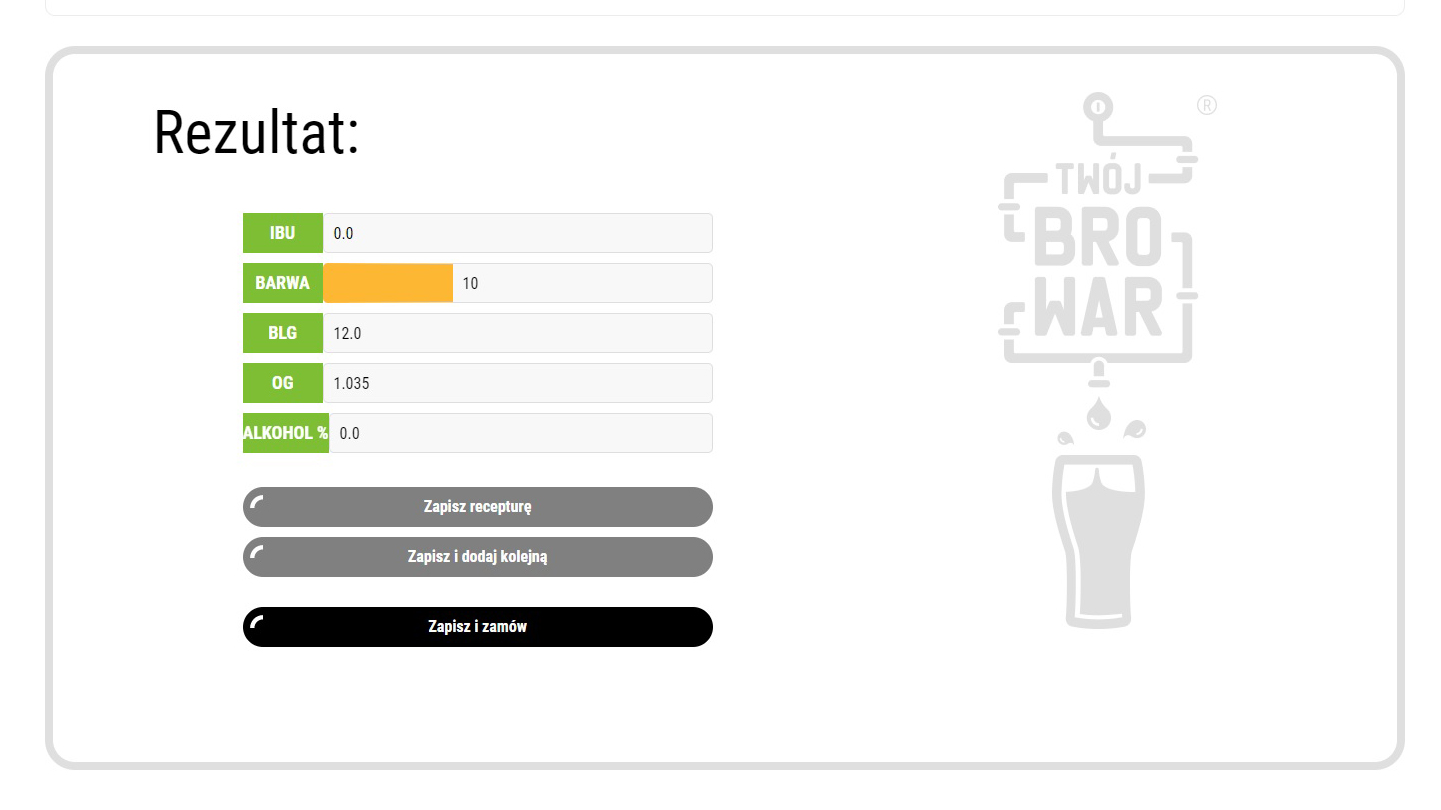
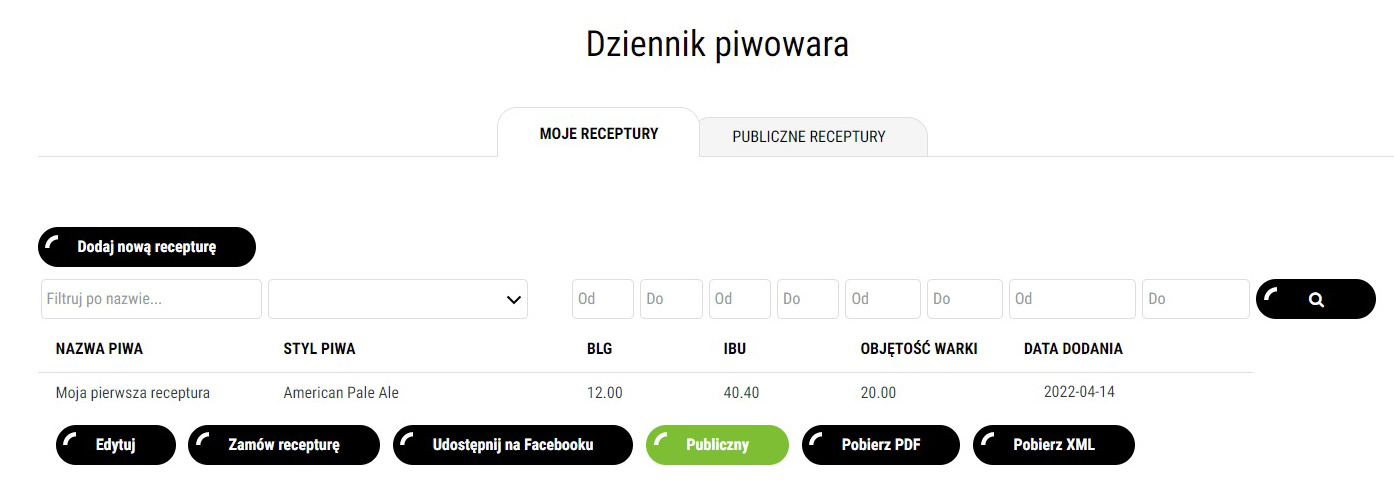
At the end, let's take a look at the final result of our recipe, from the selected ingredients we will get a beer with a color of 10 EBC, initial density of 12 BLG, bitterness at the level of 40.4 IBU and alcohol 3.4%. Here you can save your recipe, save and add by rail, and save and order ingredients in our store. After saving the recipe, you will be able to view it in your brewer's journal.
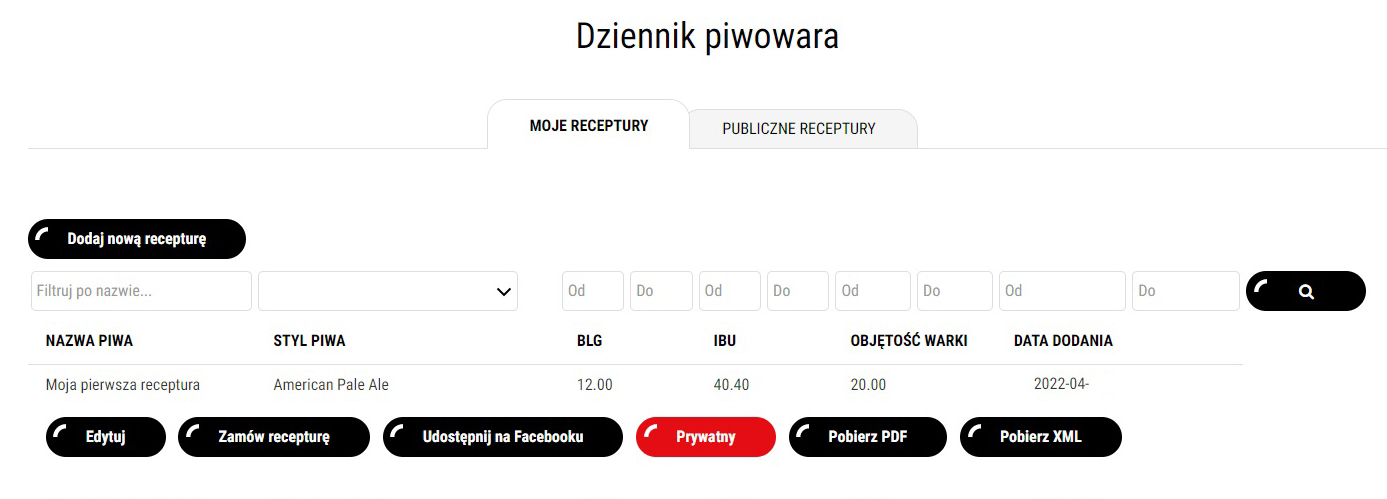
In the brewer's journal, you can edit your recipe, order its ingredients or share it on social media. By clicking the red "Private" button, you share your recipe with other users of the brewing journal. You can also download it in PDF or directly import it into the cooker by downloading the XML file, e.g. using the Grainfather app.
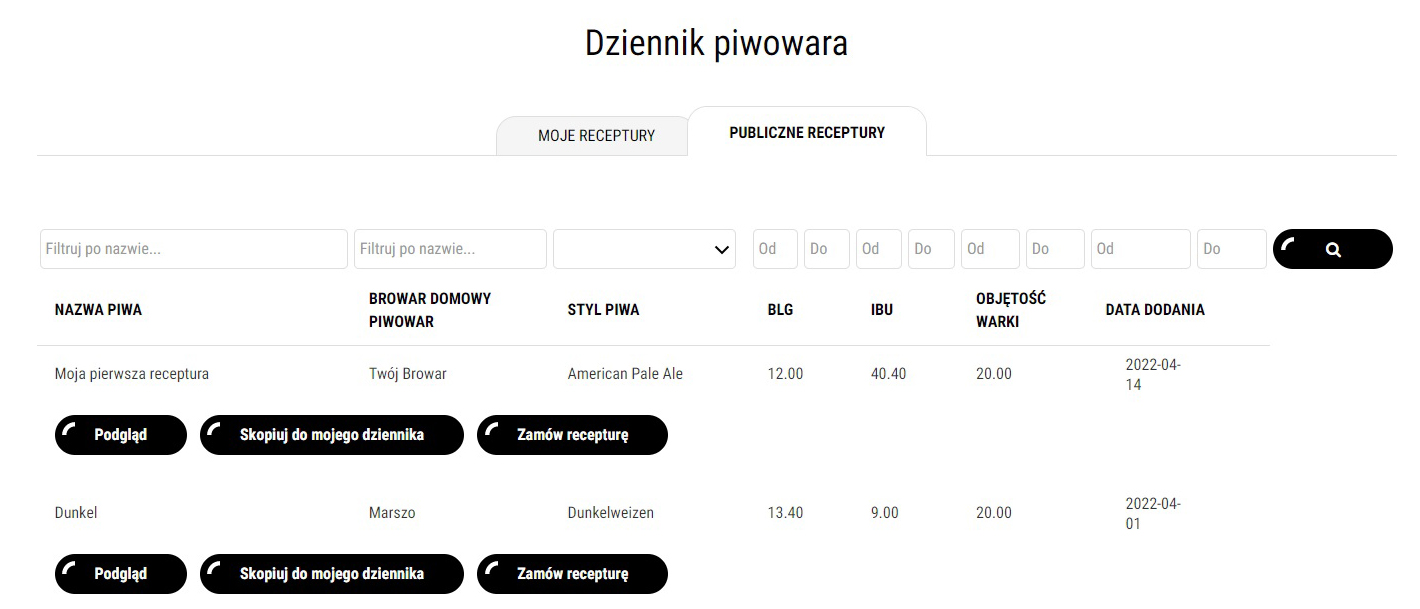
After sharing the recipe, it will appear in public recipes, where other users can see, copy to their journal or order recipes from other brewers. Hope you will discover the real world of brewing from now on, creating your own recipes and sharing them with others.


Dodaj komentarz
0 komentarze